Concepts in Sympathy for Data
Workflows
Workflow is the common name for the visual data analysis processes that are constructed in Sympathy for Data. In general, the visual workflows consist of a number of visual building blocks which are connected graphically with wires. The building blocks in Sympathy for Data are called nodes and are visual shells connected to underlying Python code that defines the functionality of the node. It is only the nodes in the workflows that perform operations on the actual data. The graphical wires represent the “transportation” of data between the nodes.
A workflow can be saved to a file, which by default will have the extension .syx. The syx-files include the graphical structure of both the workflows and any subflows as well as all the parameter settings for each node. To save a workflow click Save or Save as… in either the toolbar or in the File menu.
In Sympathy data always flows from left to right. This means that the right-most node is also the “last” node in the workflow. By double-clicking on the last node, you will start execution of any nodes to the left of that node. This might be used to execute an entire workflow (or at least everything that is connected to that node). Another way to execute an entire workflow is to simply push the “Execute” button in the toolbar.
Apart from nodes, you can also place textfields in the workflow. This is useful if you want to add a comment or description to your workflow. These text fields become a part of the workflow and are saved together with all other elements in the workflow file. To create a textfield click the button named “Insert text field” in the toolbar, then draw a rectangle on the workspace. An empty text field will appear, and by clicking in it you will be able to add some text.
Nodes
The nodes in Sympathy can be added to the workflow from the node library window, where the nodes are categorized by their functionality. Simply grab a node and drop it on the workspace.
The name of a node is located below the node. You can edit the name of a node simply by clicking on its current name. This can be used as a documentation tool to make your workflow easier to understand.
Double-clicking on a node will execute it. If other nodes need to run first your node will be queued while waiting for the other nodes. When a node is queued or executing you can right-click on it and choose Abort if you want to cancel the execution. If a node has already been executed and you want to run it again, the first thing you have to do is to reload the node, by right-clicking on it and choosing Reload. After that you can run it again.
Many nodes can be configured to perform their task in different ways. Right clicking on a node and choosing Configure will bring up the configuration GUI for that node. Some nodes have very simple configuration GUIs whereas other nodes have very complex configuration GUIs. You can read the help texts for any specific node by right clicking on a node and choosing help.
Node states
The color of the background indicates the state of the node and in the table below the different states are presented together with their corresponding colors.
| State | Color | State icon | Explanation |
|---|---|---|---|
| Armed | Beige | None | The node is ready for execution. |
| Error | Red | Warning triangle | An error occurred during the last execution of the node. |
| Invalid | Light gray | Wrench | The node’s configuration is invalid or an input port has not been connected. |
| Done | Green | Check mark | Successfully executed. |
| Queued | Blueish gray | Analog clock | The node is queued for execution. |
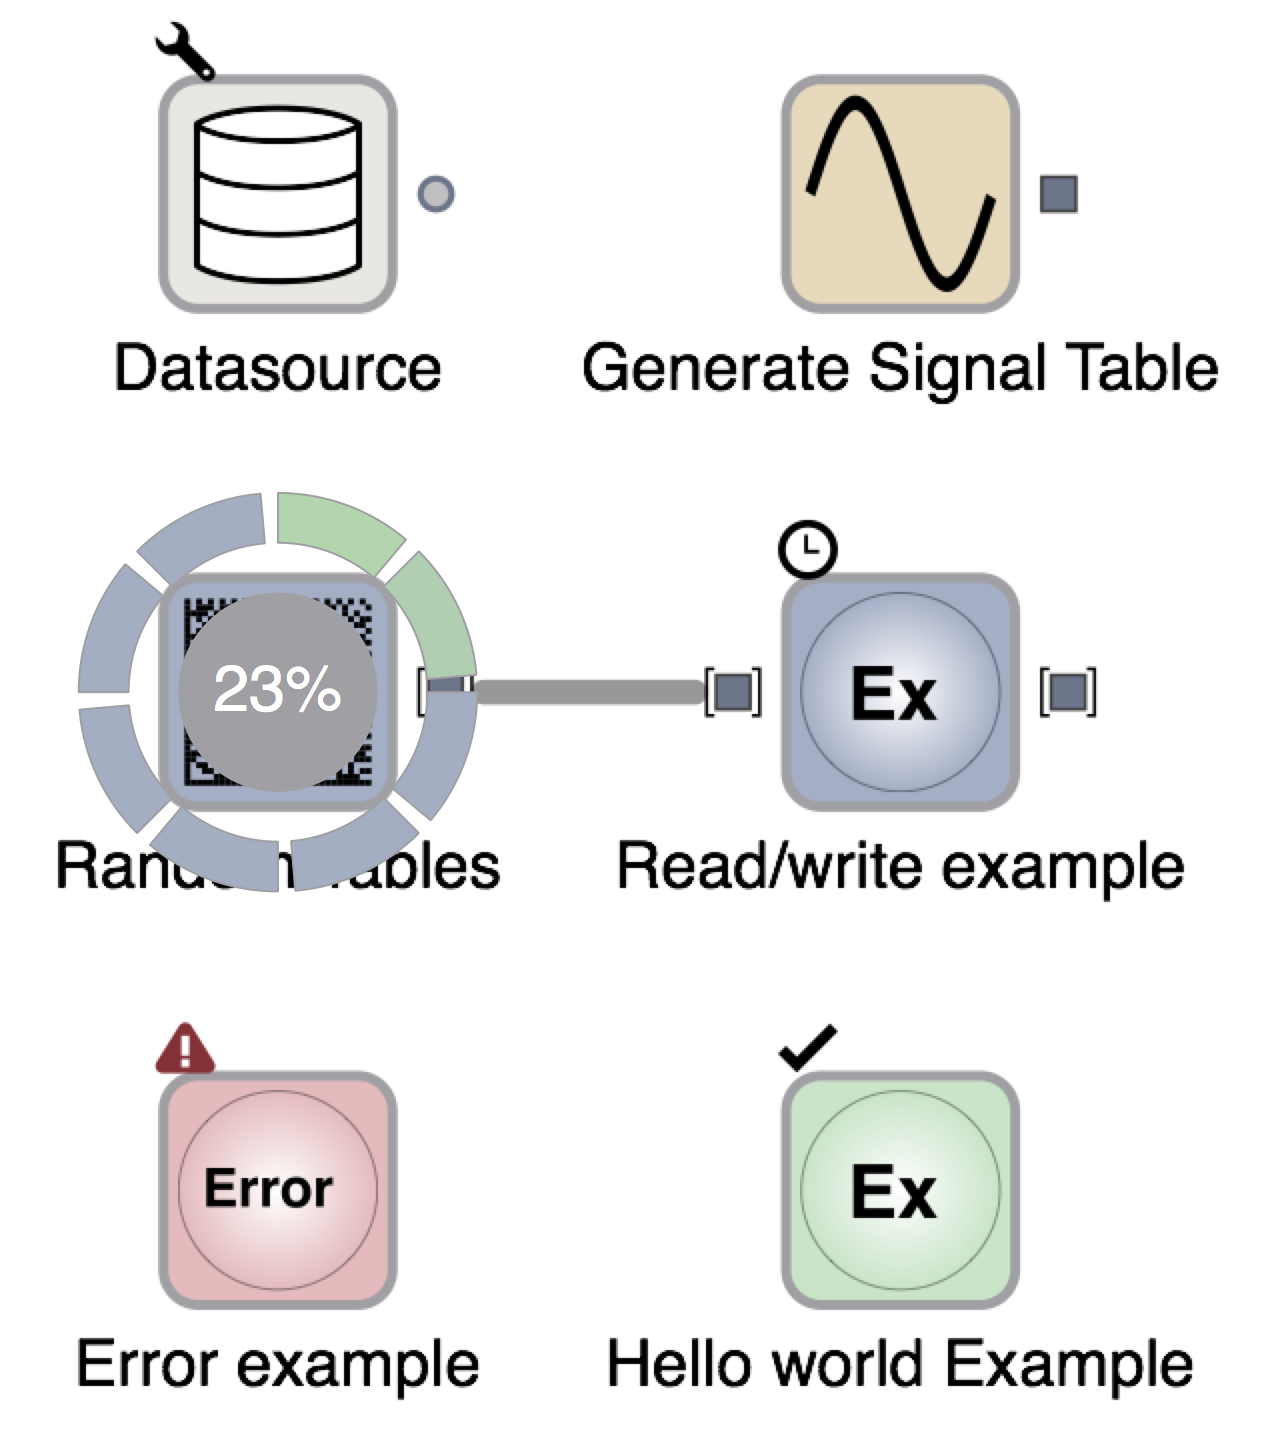
A sample of nodes in different states. The first row of nodes have not yet been executed, but while the Generate Signal Table node can the executed right now, the Datasource node requires some kind of configuration before it can be executed. The second row of nodes are being executed right now. The node to the left (Random Tables) is currently executing and Read/write example is queued and will be executed as soon as Random Tables is done. The nodes in the final row have both been executed, but while the Hello world example node was executed successfully the Error example node encountered an error during execution (as it is designed to do).
Ports
On the sides of the nodes are small symbols representing the node’s ports for incoming and outgoing data. Since the workflows are directed from left to right, the inputs are located on the left side and the outputs are on the right side.
The ports can have different symbols representing different data types. It is only possible to connect an output port with an input port of the same type. The type system in Sympathy thus ensures that only compatible nodes can be connected.
No real data is transferred between the nodes, instead paths to temporary files are exchanged. It is these temporary files on the disk that contain the actual data. Double clicking on an output port will open the data on that port in an internal data viewer.
Some nodes have a configurable number of ports. For example Extend List can have 2 or more input ports. To add another simply right-click on the port when the node is completely unconnected and choose “Create Port”. The tuple nodes can also be configured in a similar fashion.
If there are currently no input ports you instead have to right-click on the unconnected node and choose select “Create Input Port” or “Create Output Port”. There is a special input port called “Configuration Port” which can be added to any node. It will be covered separately.
Added ports and some of the default ports, for example the port named Y of Fit Texts, can be removed by right-clicking on the port and selecting Delete Port.
Addition and removal of ports is only allowed if it does not violate the types. This should be considered when modifying ports on nodes that have ports whose type depends on other ports. For example, the output port of Tuple depends on the number of input ports.
Configuration Port
Each node can optionally have a configuration port of json type which can be used to customize the configuration using data.
When added to a node it can be used to substitute parameter values in the configuration. Currently, the only nodes available for creating JSON are Manually Create JSON and Text to JSON.
For example, if we wanted to customize the number of columns generated by Random Table using the configuration port and Manually Create JSON simply right-click on Random Table and choose Create Input Port -> Configuration Port. Then connect Manually Create Table and configure it in the following way:
{'column_length': {'value': 1}}
When executed the Random Table node will now produce only one row. ‘column_length’ is the name of a parameters, if the parameters are nested in groups, the JSON configuration also needs to be nested. Luckily, few nodes use nested parameters. If Random Table had nested its ‘column_length’ parameter in a group called ‘all_parameters’ you would type:
{'all_parameters': {'column_length': {'value': 1}}}
to get the same effect as in the flat case.
For normal scalar parameters it is ‘value’ that needs to be changed, but for list parameters it is often best to change ‘value_names’. For example, to configure the selection used by Select Columns in Table:
{'columns': {'value_names': ['0', '1']}}
When executed would select columns named ‘0’ or ‘1’.
Then what is the parameter structure of some node? Create the node and right-click, choose Properties and the select the Parameters Tab. “Parameter Model” displays the relevant information (and more).
Using the json structure, it is possible to set the value of several parameters (even all of them) at once by providing values for several keys.
Data types
There are many different port types in Sympathy, and even more can be defined by third-party libraries. Following is a list of some of the more important types.
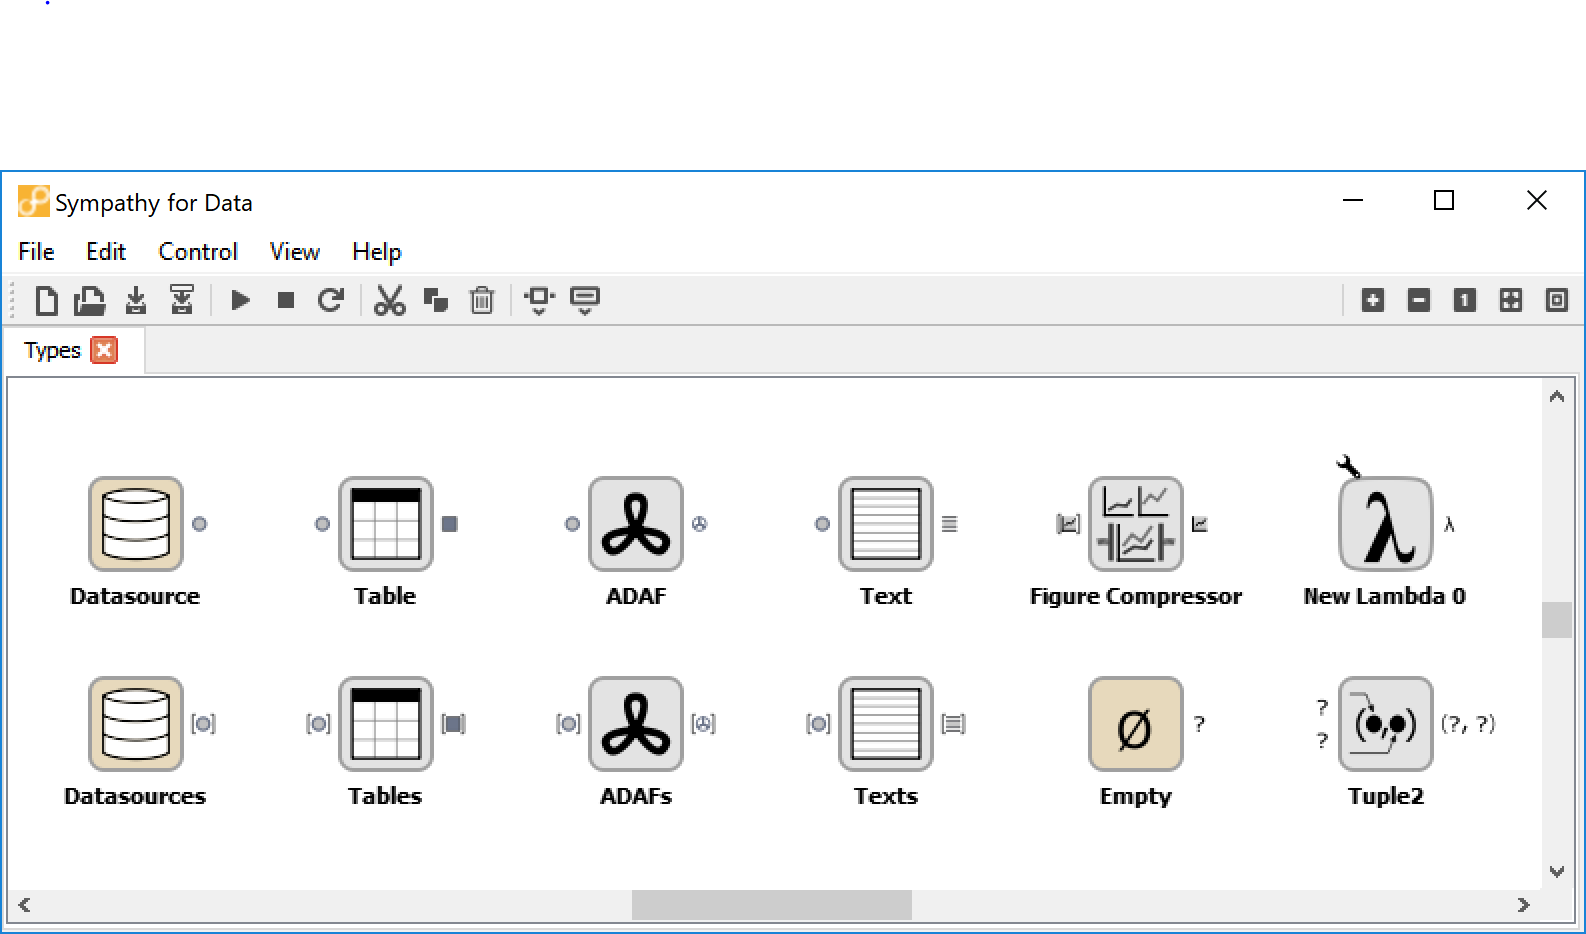
A sample of nodes to show the different types of input and output ports for the nodes in Sympathy for Data. The upper row of nodes all have single item ports whereas the nodes in the bottom row have list ports. This can be seen by the fact that those ports are enclosed by square brackets. From left to right the type of the output ports are Datasource, Table, ADAF, Text, Figure (upper), Generic (lower), Lambda (upper), and Tuple (lower), respectively.
Datasource
The Datasource format is only used as a pointer to files or to a databases. It is often used at the start of a workflow to pinpoint the data that the workflow will be working with.
See also the nodes Datasource and Datasources.
Table
Table is the most common data type in data analysis. Tables are typically found in CSV-files (comma separated values), Excel-files, and databases. Even matrices and vectors are, in some sense, tables. Most computations map very naturally to tables. A table in Sympathy is much like a database table - a collection of columns that each have a name and contains a single kind of data (numbers, strings, dates etc.). Ports which accept or output data with the Table type are represented by a gray square.
ADAF
ADAF is the data analysis format used in Sympathy when working with more complicated data. The strength of this format is that it enables the user to work with meta data (data about the data content), results (aggregated/calculated data) and timeseries (measured data) together, making advanced analysis possible in a structured way. Ports which accept or output data with the ADAF type are represented by a gray “steering wheel”.
See also Working with ADAF.
Text
The Text data type allows you to work with arbitrary text strings in Sympathy. Ports which accept or output data with the Text type are represented by a number of horizontal lines.
Lists
Lists make it possible to handle arbitrary numbers of data together in a flow. Each list can hold only one single type of element. A good example of when lists are useful is when there are a lot of files with data and the user wants to select all the files and analyze them in a single workflow. But lists are also useful in countless other scenarios as well.
See also Item to List.
Tuples
Tuples represent pairs of elements. Tuples are hetrogeneous, meaning that their elements don’t have to be of the same type. One of their primary uses are for passing multiple elements to and from a Lambda.
See also Tuple.
Generic types
Generic types are types that can change, depending on what you connect them to. This is useful, for example, for list or tuple operations that can be performed independently of the types of the elements in the list/tuple. Examples: Item to List and Tuple. Before they are connected to anything the generic types are shown as a question mark on the port.
Function types (Lambda function)
Function is a datatype that represents a function that can be executed. The type is shown as the greek letter λ on the port. The corresponding tooltip when hovering, will show something like: ‘table -> table’, ‘<a> -> <a>’, where the type before the arrow is the argument type and the type after the arrow is the result type.
Connections
The connections are represented by wires between the nodes and are established by drag and drop. Click on an output port and drag to an input port on another node or vice versa. The nodes can be disconnected by right clicking the wire and choosing Delete or by selecting the connection and pressing Delete on your keyboard. In addition to using the keyboard shortcut, mouse right-click will popup a context menu which allows connections to be removed.
Route points
The connection context menu allows route points to be created. Route points are parts of the connections that can be moved, this can sometimes be helpful to make better layouts.
Text fields
Text fields are a kind of comments or annotations that you can add to your flow. They are purely cosmetical and thus do not in any way affect the execution of a flow. But they can be a great way to add some documentation to a flow.
To add a text field use the Insert text field button in the toolbar. To edit the text in a text field, simply double-click on it and an editor will appear. In the context menu you can also change the background color of the text field. Markdown syntax is supported in text fields.
Control structures
Things like loops and if-statements are not as ubiquitous in sympathy workflows as they are in ordinary programming languages. They are instead often implemented in a more data-centric way.
Conditional execution
If you want to branch a flow and only execute a single branch, you can often get away with using filters and selectors to guide the data into different branches. For more complex conditional execution, use the node Conditional Propagate.
Looping
The easiest way to loop over data in Sympathy is to use list nodes. Most list nodes implicitly loop over all the incoming data. For example Select columns in Tables will loop over all the tables in the input and do the selection for each of them.
For the situations when there is no list node for what you need to do you can instead use the node Map to run a Lambda once for each element in a list.