Subflows
As your workflow grows it may start feeling a bit unwieldy after a while. To improve the structure of the workflow you can create a subflows from some of the nodes in your workflow. Select some nodes, right-click on one of them and choose Create subflow from selection. This will replace all the nodes that you had selected with what looks like a single node, but is actually a subflow. You can still get at the nodes by right-clicking on the subflow and choosing Edit. This will open the “inside” of the subflow in a new tab. If you want to get back to the flat workflow structure you can right-click on a subflow and choose Expand subflow to get all the nodes back where they were before.
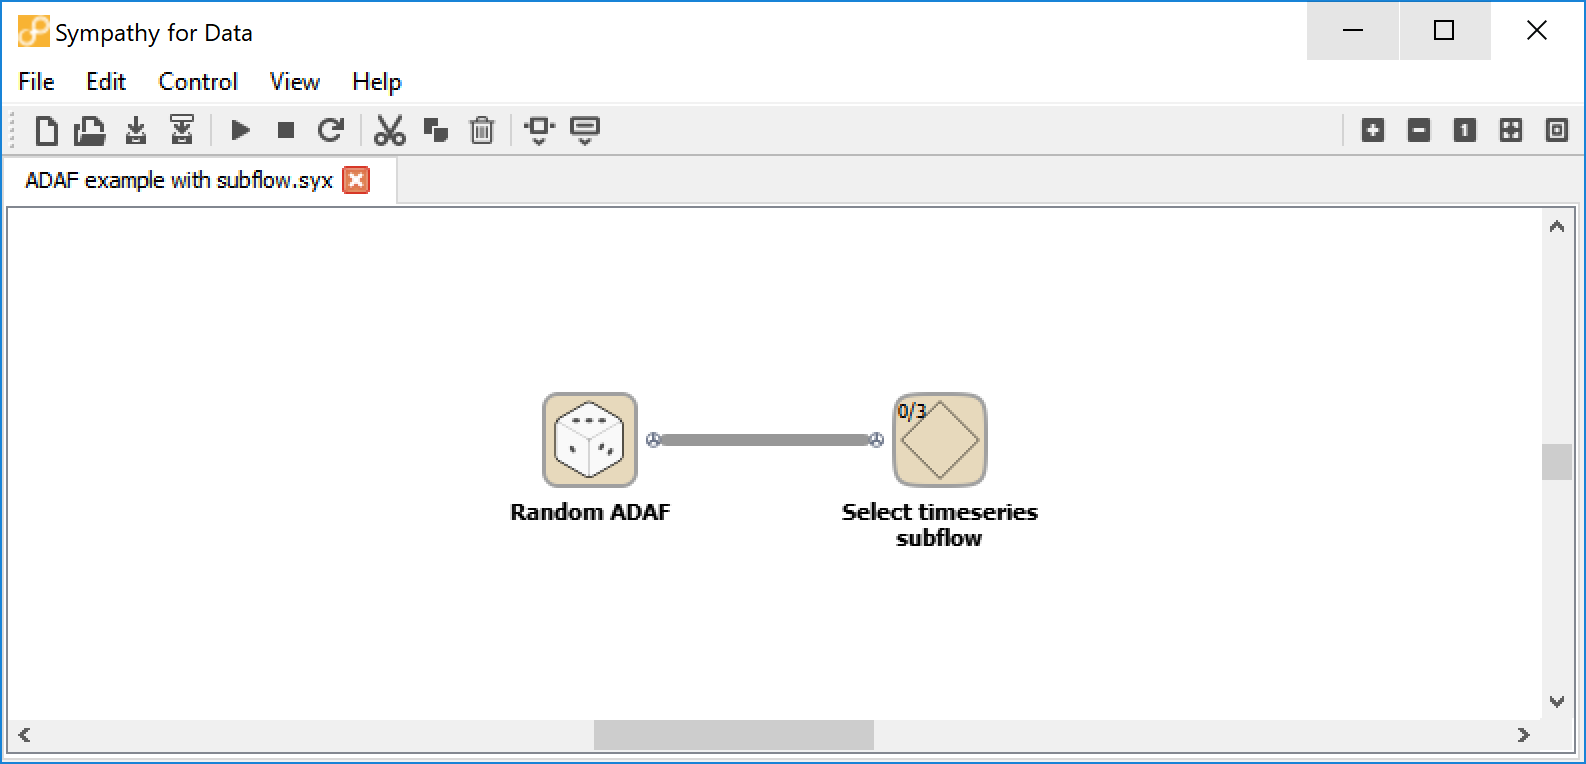
Subflow outside. This workflow can be found in <sympathy install directory>/Sympathy/Doc/workflows/ADAF example with subflow.syx.
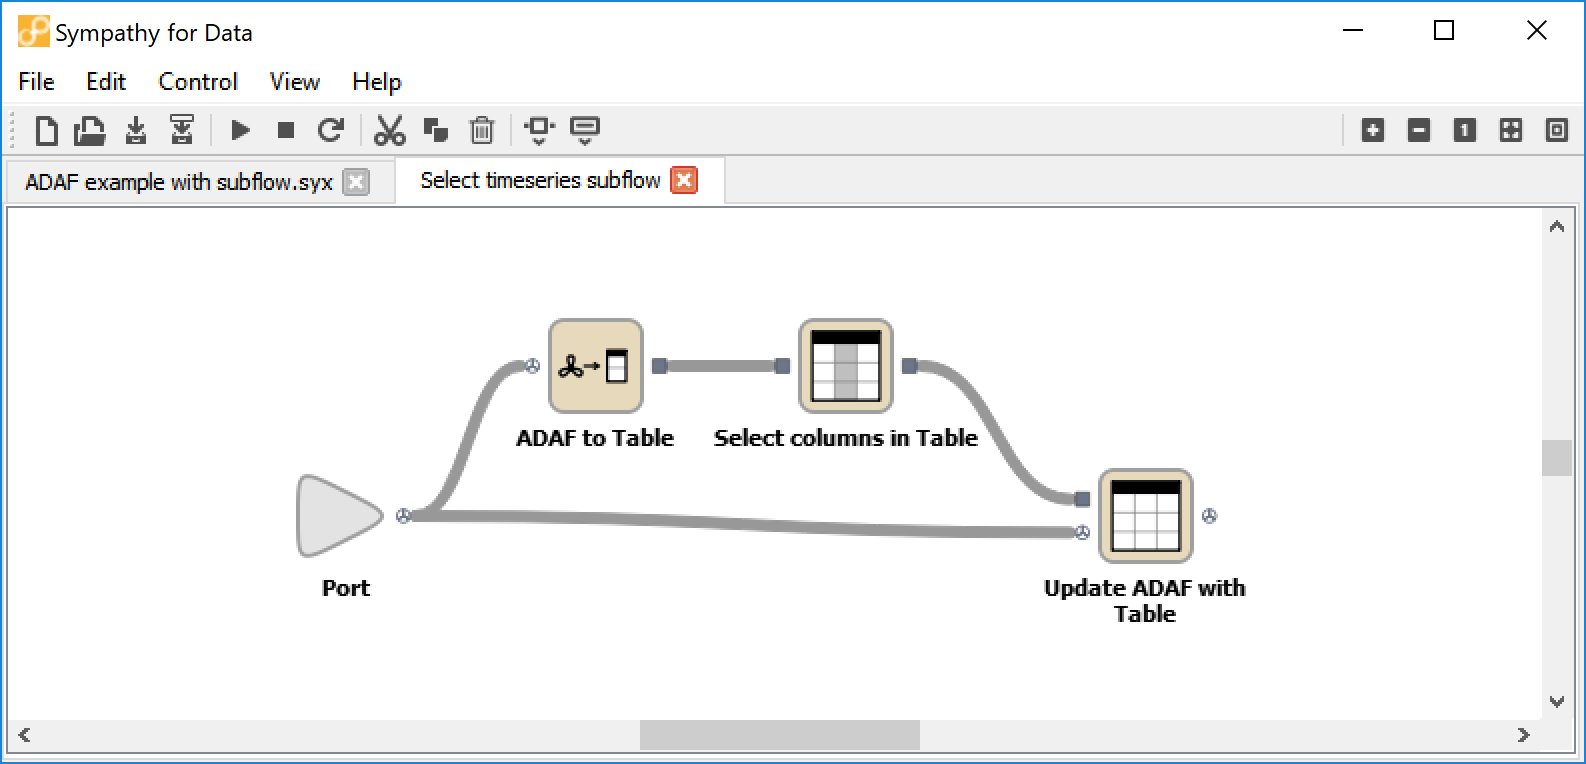
Subflow inside. This workflow can be found in <sympathy install directory>/Sympathy/Doc/workflows/ADAF example with subflow.syx.
Subflows can also contain yet other subflows so using this feature you can structure your workflow hierarchically.
Adding ports
Most of the time you want your subflow to take in data on some input ports and produce output on some output ports. Each port symbol on the “outside” of the subflow is also represented inside the subflow as a triangular node-like element.
If you want to add a new input or output port simply right-click on an empty area inside the subflow and choose Create input or Create output. A corresponding port will appear on the outside of the subflow. You can connect any data type to the little question mark of the port you just created.
Subflow settings
After you have created a subflow you can choose settings for how it should be configured. Right-click on the subflow and select Settings to launch a dialog for editing the current settings.
First of all choose the configuration dialogs that you want to include. The setting is empty by default but you can add any of the configuration dialogs from the nodes in the subflow. Move any nodes that you want from the list of available nodes (left hand side) to the list of selected nodes (right hand side).
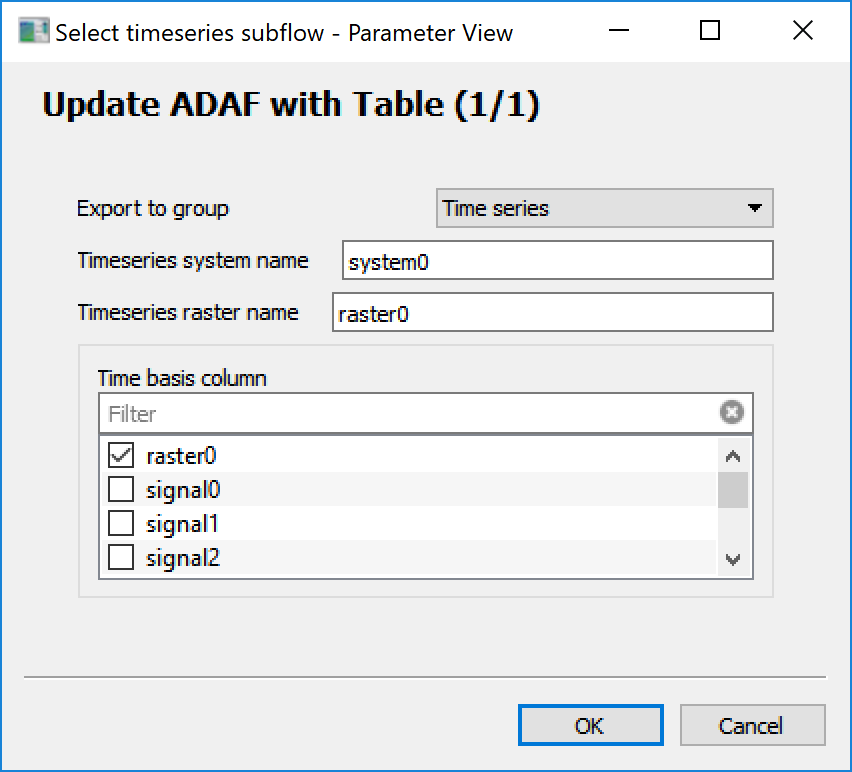
You can use this to expose a portion of the configuration options for your subflow, this is helpful to hide some of the underlying details. As an example, starting out from the example workflow from Subflows you might want to expose only the configuration for a single node, such as: Update ADAF with Table and hide everything else.
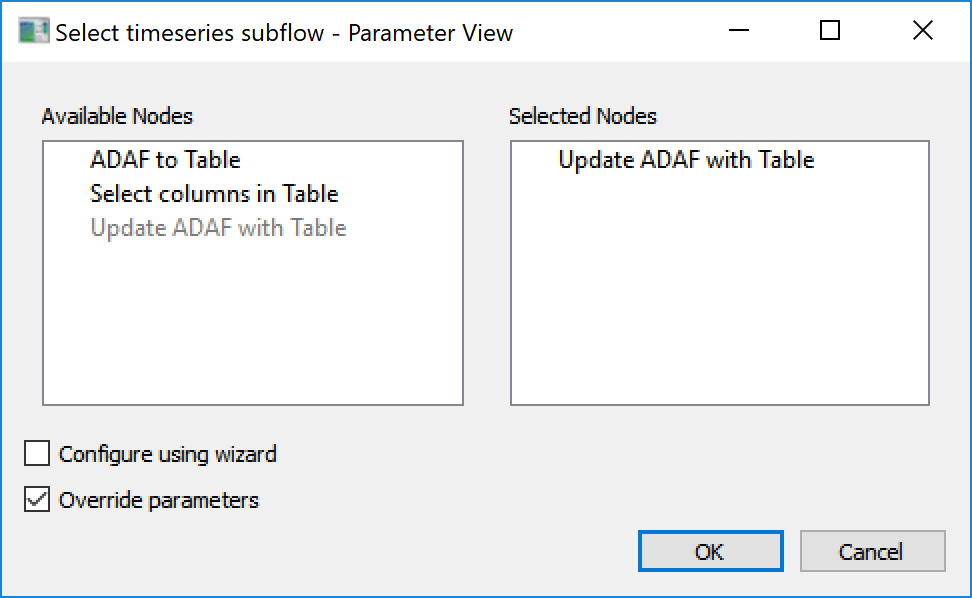
Subflow settings. This workflow can be found in <sympathy install directory>/Sympathy/Doc/workflows/ADAF example with subflow.syx.
There are two major modes to choose from: Wizard configuration and Tab configuration. These determine how the configuration dialog will be presented. By default Tab configuration is used. To change mode, simply check or uncheck the checkbox labeled “Configure using wizard”.
The checkbox labeled “Override parameters” is only used for linked subflows (see Linked Subflows) and determine if changed parameters should be stored in the subflow-link or in the workflow file that the subflow-link points to.
Subflow configuration
After you have created a subflow and edited its settings (See Subflow settings) you can configure it by right-clicking on the subflow and choosing Configure.
Depending on the mode, either a Wizard configuration dialog or a Tab configuration dialog will appear.
To configure without considering the configuration mode from settings right-click and choose Custom Configure.
Tab configuration
This configuration mode organizes the selected node dialogs in tabs. When selected node dialogs include nested subflows their node dialogs will be grouped together in a tab unless there is only one dialog.
Having all selected dialogs available as tabs provides a good overview and makes it possible to quickly select the nodes of interest and configure them.
The tabs are ordered according to the order of selected nodes in Subflow settings.
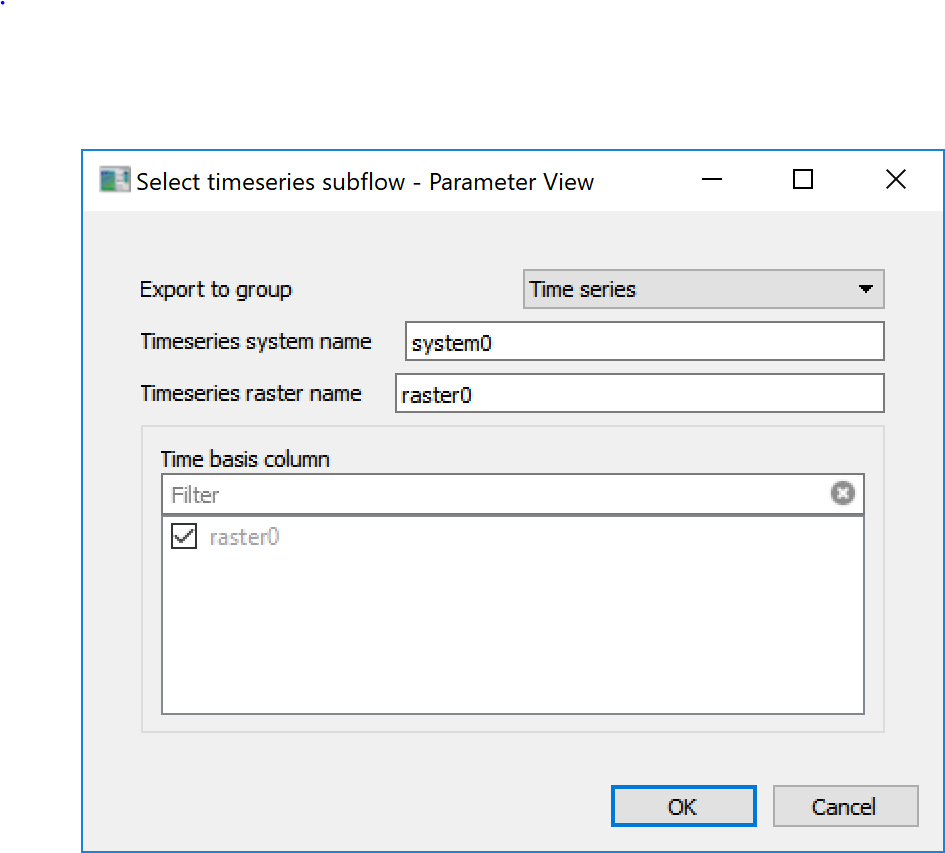
Subflow tab configuration. This workflow can be found in <sympathy install directory>/Sympathy/Doc/workflows/ADAF example with subflow.syx.
Wizard configuration
This configuration mode presents a wizard showing the configuration dialogs for the selected nodes, one at a time. The nodes will be shown in dependency order and the wizard makes sure that every preceding node is executed before each selected node dialog.
Having the preceding nodes executed when configuring is useful when the content of the dialogs depends on data, for example, the column names in the input table.
Subflow wizard configuration. This workflow can be found in <sympathy install directory>/Sympathy/Doc/workflows/ADAF example with subflow.syx. First check “Use wizard configuration” to configure in this way.
Linked Subflows
Ordinary subflows are integrated into your workflow, and are stored within the same workflow file. If you have made a very useful subflow you may want to use that in several different workflows or many times in the same workflow. You could of course simply copy your subflow but maintaining it would become cumbersome since any update that you wanted to do in the subflow will have to be made manually in all copies of the subflow.
Instead you can create a linked subflow by right-clicking on the subflow and selecting Save subflow as link. This will prompt you to save the subflow to a file and the containing workflow will now only store a link to the subflow. This is indicated by a pair of links of a chain on the outside of the subflow.
If you edit a linked subflow and save the changes any workflow that you open which contains a link to that subflow will also see those changes.
Warning
Note that the contents of any linked subflows are only read when you open a workflow. Meaning that if you already have a workflow containing a link to the subflow open when you make a change in the subflow, that workflow might not see the change until you close and reopen the workflow.
Parameter overrides
The default setting when configuring a linked subflow is to override the base parameters with the new configuration. These overrides are stored in the flow containing the subflow and thus do not affect the linked subflow file. This can be very useful when you want to use a subflow many times but with slightly different configurations. Each place where you use it will link to the same workflow file, but will use different overrides.
Note that configuring a node which has override directly will also only change the overrides. Similarly, when copying a node with overrides, the pasted node will have the active override parameters as its only parameters.
You can remove the overrides for a specific node by deselecting it in the subflow settings. If you have a specific use case where overriding parameters is not what you need you can also disable it in the subflow settings. Configuring the subflow will then change the nodes directly, and will thus affect the linked-in workflow file.
Locked Subflows
Locked subflows are executed in one process without generating intermediate files for the purpose of faster execution. Because of this, locked subflows cannot be edited or configured as long as they are locked. They are recognized by the L letter on the subflow block.
Locking and unlocking of subflows is done in the context menu for subflows. It is accessed by right-clicking on the subflow and choosing Locked. A check mark in the Locked context menu item indicates that the subflow is currently locked.
Use locked subflows to speed up the execution of subflows by avoiding costly disk operations.
Warning
Note that much more memory will be used than when executing as usual since the data which would otherwise have been written to disk is kept in memory.
Subflows in the Node Library
Subflows can be used to build new nodes for third party libraries. This can be accomplished by saving them with filenames matching flow_*.syx in a library folder. The identifier field needs to be set on the top level flow (Right-click -> Preferences: General tab). Subflows used as nodes will be linked using the identifier instead of the filename. To avoid clashes, use an identifier in the following format: <library-identifier>.<flow-identifier>. This is the same format that should be used for nodes.