Libraries
Creating new libraries
When Sympathy starts it looks for nodes in all library folders, seen in Node Libraries Preferences and to create your own node or plugins, first you have to create a library and add it to Sympathy’s list of libraries.
To create a library all you need to do is use the Library Wizard. Start it by clicking File -> Wizards -> New Library.
On the first page you will add some meta data about your library. Only name and identifier are mandatory, but go ahead and add as much as you can!
On the second page you will select the path where the library will be saved, and a preview of the folders and files created will be displayed. You can change the Package name (symbolizied by <package-name> in the following sections) if you want, but this is not needed.
When you have finished the wizard, the library has been automatically added to Node Libraries Preferences. Note, this is not synonymous with adding libraries to the library view.
New Library Format
Starting with Sympathy 2.0.0 there is a new format for libraries that is more “python-like”. One benefit from the new format is the ability to distribute libraries like any other python package. When you are creating a new library the new format is recommended unless you also need to support older Sympathy versions.
Library structure
This is the new, recommended way to structure a node library:
<library-root>
├── setup.py
├── src
│   └── <package-name>
│       ├── __init__.py
│       ├── flows
│       │   └── ... (flows)
│       ├── nodes
│       │   └── ... (nodes)
│       └── plugins
│           └── ... (plugins)
│       └── examples
│           └── ... (example flows)
└── test
    ├── test.py
    ├── flows
    │   └── ... (test flows)
    └── ... (unit tests)
Tests of your library’s functionality should be placed in test and Example flows that show off how your nodes work should be placed in example. Test and examples folders are completely optional.
Library meta data
Meta data fields are defined as functions without arguments.
Tags for organizing nodes in Library View.
Return value and type ommited, see the source for actual values.
-
sympathy.api.library.types()[source]¶ Port type definitions.
Return value and type ommited, see the source for actual values.
-
sympathy.api.library.flows() → List[str][source]¶ - Returns
Paths to python files containing flow nodes.
-
sympathy.api.library.identifier() → str[source]¶ - Returns
Library identifier, which should be unique. See https://en.wikipedia.org/wiki/Reverse_domain_name_notation
-
sympathy.api.library.name() → str[source]¶ - Returns
Library name as shown in Library View, documentation etc.
-
sympathy.api.library.plugins() → List[str][source]¶ - Returns
Paths to python files containing node plugins.
-
sympathy.api.library.required_features() → List[str][source]¶ - Returns
Features required for enabling the library.
The file __init__.py in the <package-name> can be edited to customize the meta data for libraries.
Old Library Format
Older library format used in Sympathy before 2.0.0. Recommended if you want the library to be usable from older Sympathy versions.
Library structure
This is the old way to structure a node library:
<Library-root>
├─ Library
│  └─ <Library-name>
│     └─ ... (nodes & plugins)
├─ Common
│  └─ <package-name>
│     └─ ... (python modules)
├─ Tests
│  ├─ Unit
│  │  └─ test.py
│  └─ Workflow
│     └─ ... (test flows)
├─ Examples
└─ library.ini
The Library folder is where you put nodes and plugins. The Common folder is for additional python modules. Tests of your library’s functionality should be placed in Tests and Example flows that show off how your nodes work should be placed in Examples. Tests and Examples folders are completely optional.
Library meta data
The file Library.ini in the library root may contain extra meta data for the library. The following fields are recognized in the General section:
nameThe human readable name of the library.
descriptionThe human readable description of the library.
identifierAnd identifier for this library. Should only contain
library_pathThe path of the library folder relative to the library root.
common_pathThe path of the package inside the common folder relative to the library root.
maintainerThe name and contact information of the current maintainer of the libary. Can be an indiviual person, an organisation or a community.
copyrightA copyright notice that is shown with all nodes.
repositoryUrl to repository for the library).
documentationUrl to documentation for the library).
homeUrl to home for the library).
Add extra modules to your library
If your node code is starting to become too big to keep it all in a single file or if you created some nice utility functions that you want to use in several different node files you can place them in the <package-name> folder.
Open your favorite editor and create the file:
<package-name>/mymodule.py
The parent of the <package-name> folder will automatically be added to sys.path so you will
be able to import modules from that package in your node code:
from <package-name> import mymodule
Library tags
Each library may define additional node tags. These tag definitions go into the file <package_name>/__init__.py, and it can look something like this:
from sympathy.api.nodeconfig import LibraryTags, TagType, GroupTagType

    # Assuming a new library format.
    # If you use Old Library Format, rename tags() function to library_tags().
def tags():
    return [
        ExamplelibLibraryTags
    ]


class ExamplelibLibraryTags(LibraryTags):
    class_tags = (
        GroupTagType(
            'example',

            # First group
            [GroupTagType(
                'GroupOne',
                [TagType('TagOne',
                         'Tag description'),
                 TagType('TagTwo',
                         'Tag description')]
            ),

            # Second group
            GroupTagType(
                'GroupTwo',
                [TagType('TagOne',
                         'Tag description',
                         name='Optional tag name that can hold non-alphabetic characters')]
            ),

            # Third group
            GroupTagType(
                'GroupThree',
                [TagType('TagOne',
                         'Tag description'),
                 TagType('TagTwo',
                         'Tag description'),
                 TagType('TagThree',
                         'Tag description')],
                name='Optional group name that can hold non-alphabetic characters')
            ]
        )
    )

    def __init__(self):
        super().__init__()
        self._root = self.class_tags
This will create a structure like below (if using Separated Tag Layout, otherwise the tags will be mixed in with those already existing):
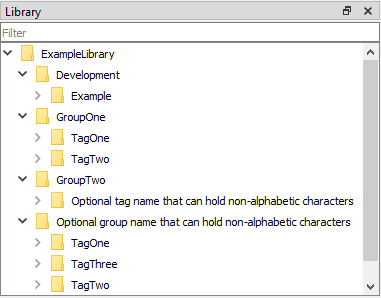
Note that tags won’t show up in the tree until they are used by at least one node. The tags are searchable when using Wizards to create new nodes.
Example flows
Workflows in the Examples directory (create it, if it does not exist, before adding example flows) of a library will be treated as examples.
Example flows are treated similarly to test workflows in that they are executed automatically when running the built-in test suite. See Writing tests for your nodes.
Additionally, example flows can specify (on the top-level) that they are
examples for one or several nodes by including a reference in the following
format: Node example: *<node-identifier>* (for example, Node
example: *com.example.boblib.helloworld*) inside text fields. Alternatively,
to make the example reference fit better as part of a sentence, the following
format is also supported: Node example for *<node-identifier>*.
The documentation for referenced nodes will include links to referencing example flows. Example flows are copied into the documentation folder and as a rule, it is best if they are self-contained and do not depend on other workflows or data files.