Node writing
Sympathy’s standard library contains a lot of useful nodes and it is also possible to add complete third-party libraries without writing any code yourself. But sometimes you might come to a point when the node that you need simply has not been written yet. One option is to write your own node.
All Sympathy nodes are written in Python, http://python.org, a powerful scripting language whose main goal is to be easy to learn. Python has a very powerful set of standard libraries, but the standard libraries are a bit lacking when it comes to high performance numerical computations. Because of this Sympathy comes with some third party libraries that are great for numerical computations and data analysis:
- numpy
- The basis for most of the other libraries mentioned here and therefore also the most useful library. It provides you with a generic data type for numerical data and some basic calculations on those data types. See http://wiki.scipy.org/Tentative_NumPy_Tutorial, or http://docs.scipy.org/doc/numpy/user/basics.html, or http://wiki.scipy.org/NumPy_for_Matlab_Users for some introduction.
- scipy
- Provides functions for more advanced analysis such as numerical integration, solving differential equations, optimization, and working with sparse matrices. See http://docs.scipy.org/doc/scipy/reference/.
- pandas
- See http://pandas.pydata.org/.
To create and edit nodes you will need some text editor or Python IDE. If you do not already have a favorite editor/IDE, we recommend Spyder. Spyder is suitable for editing Python files and is distributed with Sympathy.
Creating a library structure
When Sympathy starts it looks for nodes in all folders in File->Preferences->Node Libraries in Sympathy. So to create your own node, first you have to create a library and add it to Sympathy’s list of libraries.
To create a library all you need to do is use the Library Wizard. Start it by clicking File->New Library.
On the first page you will add some meta data about your library. Only name and identifier are mandatory, but go ahead and add as much as you can!
On the second page you will select the path where the library will be saved, and a preview of the folders and files created will be displayed. You can change the common package name if you want, but this is not needed.
When you have finished the wizard, the library has been automatically added to File->Preferences->Node Libraries. Note, this is not synonymous with adding libraries to the library view.
The node wizard
The easiest way to get started writing your own node is to use the node wizard. It will create an outline of a node code for you, so you can get right at implementing the actual functionality of the node. To start the node wizard go to File->*New Node*. If you want to write all the code by hand, feel free to skip ahead to the section The node code.
On the first page of the wizard you can edit some descriptive meta data for your new node. Please consider carefully what you write here as this affects how well a user will be able to understand what your node does. See the section Node definition for detailed info about the different fields.
The second page allows you to add input ports to your node. Enter a name, a description and choose a data type, and press Add. On the next page you can add output ports in the same way.
The next page of the wizard is where you choose in which library your node should be created as well as where in the internal structure of that library the node should be placed. The Library Identifier field should contain an identifier for the whole library. It must be the same for every node in the entire library. It should be of the form <extension>.<organisation>. Something along the lines of com.example. The Library Path field should be the absolute path to the library where you want the node, and the Node Path should be the relative path inside that library to the folder where the node should be placed. If your library is present in the file tree structure below the text fields, you can also simply click on the folder where you want the node and all fields on this page should be automatically filled. Note, libraries that you create will not be placed in the library view automatically.
Click Next to proceed to the last page of the node wizard where you will be presented with a preview of the node code. When finishing the wizard this code will be written to a file that represents your node.
Warning
You can in theory add new nodes to Sympathy’s standard library (by moving the python files manually) or to some third-party library and have them appear in the Library view in Sympathy. This is not recommended though as it makes it much more difficult to manage library updates and such. In order to place nodes under a certain library in the library view, read the subchapter “Library tags” below.
The node code
Nodes are loaded from their definition files when Sympathy is started, and only
Python files with names starting with node_ and ending with .py will
generate nodes. You can place the nodes in subfolders to group related nodes
together. Now, create a file called node_helloworld.py and open it in your
editor of choice.
Without further ado let us look at the code for a simple example node:
from __future__ import (print_function, division, unicode_literals,
                        absolute_import)
from sympathy.api import node
from sympathy.api.nodeconfig import Port, Ports, Tag, Tags


class HelloWorld(node.Node):
    name = 'Hello world!'
    author = 'Bob <bob@example.com>'
    copyright = '(C) 2014, 2017 Example Organization'
    version = '1.0'
    icon = ''
    description = 'An amazing node!'
    nodeid = 'com.example.boblib.helloworld'
    tags = Tags(Tag.Development.Example)

    def execute(self, node_context):
        print('Hello world!')
Copy this code into the file node_helloworld.py, reload the libraries in
Sympathy (File->Reload Library) and add the node to a new workflow.
A node is defined as a Python class which inherits from
sympathy.api.node.Node. The name of the class is irrelevant. The
class definition starts with a description of the node, then you have to
define some variables that contain meta data about the node. Lastly, you
write the method that actually controls the behavior of the node (such as
execute). For all the details of what goes in a node class, please refer to
the :ref:node_reference.
You can place several such classes in the same python file, but only do this if they are clearly related to one another.
Library tags
In the example above you may have spotted the tags variable. Each node can be part of one or several library tags. This specific one:
tags = Tags(Tag.Development.Example)
will group the node into the Development->Test folder in the library
hierarchy. To see what different tags are available have a look in Library/Common/sylib/librarytag_sylib.py or look at the code of any specific node which uses the tag that you are interested in. If the tags row is commented out in order to become deactivated, the nodes belonging to that library will be shown under a library called “Unknown” in the library view.
Adding input and output ports
The possibilities for a node with neither input nor output are quite limited.
To add a single Table output port to your node, add the class variable
outputs as follows:
from __future__ import (print_function, division, unicode_literals,
                        absolute_import)
import numpy as np

from sympathy.api import node as synode
from sympathy.api.nodeconfig import Ports, Port, Tags, Tag

class FooTableNode(synode.Node):
    """Creates a foo Table"""

    name = 'Create foo Table'
    nodeid = 'com.example.boblib.footable'
    author = 'Bob <bob@example.com>'
    copyright = '(C) 2014, 2017 Example Organization'
    version = '1.0'
    tags = Tags(Tag.Development.Example)

    outputs = Ports([Port.Table('Table of foo', name='foo')])

    def execute(self, node_context):
        outputfile = node_context.output['foo']
        outputfile.set_column_from_array('foo column', np.array([1, 2, 3]))
Also notice the new import statements at the head of the file. Reload the library and add a new instance of your node to a workflow. You can see that it now has an output port of the Table type.
Writing to the output file is as easy as adding those two lines to your
execute method.
The object outputfile which is used in the example is of the class
table.File Please refer to the Table API to get more information
about how to interact with the Table data type. Once again, reload the
libraries, add the node to a flow, and execute it. With these changes the node
will produce an output table with a single column called foo column
containing the values 1, 2, and 3.
Inspect the output by double clicking on the output port of your node. It will open in Sympathy’s internal data viewer.
If you want your output to be a modified version of the input you can use the
source method:
from __future__ import (print_function, division, unicode_literals,
                        absolute_import)
import numpy as np

from sympathy.api import node as synode
from sympathy.api.nodeconfig import Ports, Port, Tags, Tag

class AddBarNode(synode.Node):
    """Adds a bar column to a Table."""

    name = 'Add bar column'
    nodeid = 'com.example.boblib.addbar'
    author = 'Bob <bob@example.com>'
    copyright = '(C) 2014, 2017 Example Organization'
    version = '1.0'
    tags = Tags(Tag.Development.Example)

    inputs = Ports([Port.Table('Input Table', name='foo')])
    outputs = Ports([Port.Table('Table with some added bar', name='foobar')])

    def execute(self, node_context):
        inputfile = node_context.input['foo']
        outputfile = node_context.output['foobar']
        outputfile.source(inputfile)
        number_of_rows = inputfile.number_of_rows()
        outputfile.set_column_from_array('bar',
            np.arange(number_of_rows, dtype=int))
All the other basic port data types are also available in the Port class,
such as ADAF, Datasource, and Text. Try changing your port to some
other type and add it again to a flow (do not forget to reload libraries first)
to see the port data type change. You can also just as easily add several input
or output ports to a node:
inputs = Ports([Port.Datasource('Input foo file', name='foofile'),
                Port.ADAFs('All the data', name='alldata')])
outputs = Ports([Port.Table('Table with baz', name='baz'),
                 Port.ADAF('The best data', name='outdata')])
Note though that the different data types have different APIs whose references can be found here: Data type APIs.
If you need ports of some type which does not have its own method in
Port (such as generic types or lambdas) see Using custom port types.
Adding a configuration GUI
Many of the nodes in the standard library have some configuration settings that affect the details of what the node does when executed. For example in Random Table you can choose how big the generated table should be.
Going back to the original Hello world node, let us now offer the user a choice of what greeting to print.
Parameters are defined in the class variable parameters. Create a new
parameters object by calling the function synode.parameters. Then add all
the parameters with methods such as set_string. In our example it would
look something like this:
from __future__ import (print_function, division, unicode_literals,
                        absolute_import)
from sympathy.api import node as synode
from sympathy.api.nodeconfig import Tags, Tag


class HelloWorldNode(synode.Node):
    """Prints a custom greeting to the node output."""

    name = 'Hello world!'
    author = 'Bob <bob@example.com>'
    copyright = '(C) 2014, 2017 Example Organization'
    version = '2.0'
    icon = ''
    description = 'An amazing node!'
    nodeid = 'com.example.boblib.helloworld'
    tags = Tags(Tag.Development.Example)

    parameters = synode.parameters()
    parameters.set_string(
        'greeting',
        value='Hello world!',
        label='Greeting:',
        description='Choose what kind of greeting the node will print.')

    def execute(self, node_context):
        greeting = node_context.parameters['greeting'].value
        print(greeting)
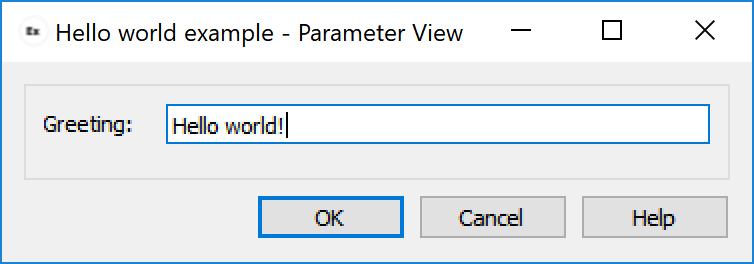
Once again try reloading the library and readding the node to a flow. You will
notice that you can now configure the node. A configuration GUI has been
automatically created from your parameter definition. As you can see the
label argument is shown next to the line edit field and the description
and run the node.
fargument is shown as a tooltip. Try changing the greeting in the configuration
You can add parameters of other types than strings as well by using the methods
set_boolean, set_integer, set_float, set_list. Most of them
have the same arguments as set_string, but lists are a bit different. A
simple example of storing a list can be found in Error example and looks
like this:
parameters.set_list(
    'severity', label='Severity:',
    description='Choose how severe the error is.',
    plist=['Output', 'Warning', 'Error', 'Exception'], value=[2],
    editor=synode.Util.combo_editor().value())
This list is named “severity” and contains the list specified by the plist
argument. The value argument specifies which element(s) in the list that
are selected by default. In this case the third item, “Error”, (with index 2)
is selected. The editor argument is used to specify that we want this list
to be shown in a combobox.
See Parameter helper reference for more details or see All parameters example for more examples of how to use all the different parameter types and editors.
Errors and warnings
Any uncaught exceptions that occur in your code will be shown as Exceptions
in the error view. The stack traces in the details can be very valuable while
developing nodes, but are pretty incomprehensible for most users. Because of
this you should always try to eliminate the possibility of such uncaught
exceptions. If an error occurs which the node cannot recover from you should
instead try to raise an instance of one of the classes defined in
sympathy.api.exceptions. Here is an example that uses
SyConfigurationError:
from sympathy.api.exceptions import SyConfigurationError
from sympathy.api import node as synode
from sympathy.api.nodeconfig import Tags, Tag

class HelloWorldNode(synode.Node):
    """Prints a custom greeting to the node output."""

    name = 'Hello world!'
    author = 'Bob <bob@example.com>'
    copyright = '(C) 2014, 2017 Example Organization'
    version = '3.0'
    icon = ''
    description = 'An amazing node!'
    nodeid = 'com.example.boblib.helloworld'
    tags = Tags(Tag.Development.Example)

    parameters = synode.parameters()
    parameters.set_string(
        'greeting',
        value='Hello World!',
        label='Greeting:',
        description='Choose what kind of greeting the node will print.')

    def execute(self, node_context):
        greeting = node_context.parameters['greeting'].value
        if len(greeting) >= 200:
            raise SyConfigurationError('Too long a greeting!')
        print(greeting)
This will produce a more user friendly error message.
If you simply want to warn the user of something that might be a concern but
which does not stop the node from performing its task, use the function
sympathy.api.exceptions.sywarn:
from sympathy.api.exceptions import sywarn
from sympathy.api import node as synode
from sympathy.api.nodeconfig import Tags, Tag

class HelloWorldNode(synode.Node):
    """Prints a custom greeting to the node output."""

    name = 'Hello world!'
    author = 'Bob <bob@example.com>'
    copyright = '(C) 2014, 2017 Example Organization'
    version = '4.0'
    icon = ''
    description = 'An amazing node!'
    nodeid = 'com.example.boblib.helloworld'
    tags = Tags(Tag.Development.Example)

    parameters = synode.parameters()
    parameters.set_string(
        'greeting',
        value='Hello world!',
        label='Greeting:',
        description='Choose what kind of greeting the node will print.')

    def execute(self, node_context):
        greeting = node_context.parameters['greeting'].value
        if len(greeting) >= 100:
            sywarn("That's a very long greeting. Perhaps too wordy?")
        print(greeting)
See Messages window for more info about how the error view shows different types of output. See the Error example node for another example.